
Welcome back to the Grimoire Series! In this third and final installment, I’ll be giving you a few ways that you can take your own grimoire to the next level with creative additions. I’m a creative at heart. I spent my entire childhood and adolescence drawing, painting, playing around in darkrooms, and otherwise finding ways to inject creativity into every aspect of my life.
That creative streak has definitely followed me into my craft. I cast spells with collages made from magazines. I make plaster altarpieces, press flowers (most of which end up strewn loosely around my room), and paint thrifted objects to make them beautiful so I can use them in my craft. This process of creation is both a beautiful addition to my craft and an essential part of how I breathe life into it.
Of course, this creative streak has also greatly influenced how I’ve approached my grimoire as well. Give me a lot of blank sheets of paper and tell me to make it beautiful and I will happily oblige in a huge variety of ways! Here are a few of my favorite ways to creatively enhance my grimoire.
1. Add photographs
Most grimoires that I see are heavy on the illustrations. Page after page of painstakingly drawn images to adorn the spells and instructions. While there’s nothing wrong with adding illustrations to your grimoire I think we’ve all gotten a little sidelined by the “traditional grimoire” image. We’re so used to seeing this ancient, handmade, perfectly crafted grimoire aesthetic in media that this is, in our minds, the default for how a grimoire should look. It doesn’t have to be though!
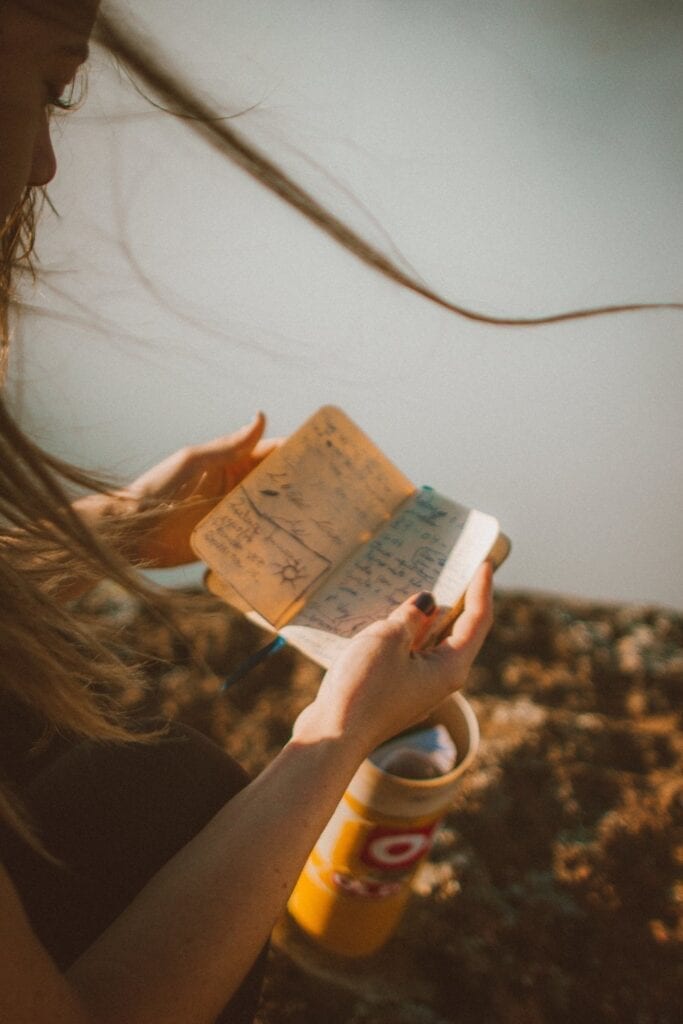
One of my favorite ways to add a little interest to my grimoire is with photos. Polaroids, disposable camera photos, and printouts of photos from your phone can all make amazing additions to your magical book, no need to use some fancy camera if you don’t already have one. Take photos of your altars and crystal grids, have someone take photos of you during your rituals, capture photos of beautiful natural spaces, take pictures of plants you want to dedicate pages of your grimoire to, there are SO many ways to incorporate photography into your grimoire! I love this approach to grimoires so much, adding photos like this can give your grimoire a really retro vibe.
If you’re not into taking photos yourself, consider using cutout photos from magazines. It might take some looking to find magazines with the aesthetic you want but this is a great way to add some color and imagery to your grimoire if you’re not into illustration or photography.
2. Add pockets and envelopes
Pockets and envelopes are amazing. You can glue pre-made envelopes right onto the pages, use washi tape to create pockets, or even make your own envelopes out of pretty papers that you find. And there are tons of ways to use these pockets! Use them to hide away samples of herbs, powerful chants and spells, extra photos, locks of hair, whiskers that your cat has shed, dirt or sand from a sacred place that you want to keep close, and pretty much anything else you can fit in them!
3. Make your own paper
Making your own paper is surprisingly simple and allows you to incorporate all kinds of witchy additions into your grimoire pages. You can add herbs, spell ashes, or splashes of color into your pages as you make them in order to weave spells into the paper itself. My favorites are sage to aid in protection, cedar for increasing spiritual powers, and black pepper for keeping your grimoire secret.
You can learn how to make your own paper with this tutorial. It doesn’t take much in the way of equipment and you can use recycled paper to make your paper pulp. This technique may seem best suited to looseleaf books but there are tons of ways to use handmade paper in a bound book as well! Handmade paper can be turned into envelopes, add in cards, decoration and much more.
4. Add pressed leaves and flowers
Pressed leaves and flowers are one of my favorite ways to add interest to my grimoire. Instead of having to painstakingly illustrate herbs, flowers, and plants, I can just press an example of each plant and paste it straight onto the appropriate page when it’s finished.
To press flowers, all you’ll need are a few heavy books that you won’t need to use for a while, a few sheets of paper, and any leaves or flowers that you want to press. Place the leaves and flowers near the back of one of the books, using the extra sheets of paper to protect the book’s pages, stack a few heavy books on top of it and then leave it for 2-3 weeks.
5. Age the paper using tea
Staining paper with black tea gives it the appearance of age and for some of us, this “old book” look can be super fun. The technique is simple, all you have to do is dip your pages in strong black tea and then leave them to dry. This usually works best with looseleaf, binder style books as you wouldn’t want to damage the binding of a notebook. If you want the sheets of paper to dry flat all you’ll need to do is stick the wet pieces of paper to a glass window. The page will dry stuck to the window and be flat and will still peel off the window easily when it’s finished. If you like the warped paper look, use a towel to blot off excess moisture and then leave it to dry normally.
6. Make your own stamps to decorate pages
Making stamps gives you a simple way to quickly decorate pages with illustrations, signatures, page borders, or sigils. There are plenty of ways to create stamps from the incredibly simple but short-lived potato stamp to more complex linoleum stamps.
Here are a few tutorials for stamp making to help you get started with this!
7. Add pages that are simply there to add beauty
Many people feel that every page of a grimoire has to be packed with information. This isn’t so! It can be wonderfully rewarding to incorporate pages that exist simply to beautify your book. There are tons of ways to do this, from collaging, to painting, to ink drawing or even including poetry. These pages might serve a specific purpose, like honoring a deity, marking important events in your life or craft, or expressing spiritual thoughts in an artistic form, or they might simply be for the fun of making something beautiful. I frequently find myself returning to these pages over and over because their symbolic meaning can convey so much more than the instructional parts of my book. I can use these artistic portals to transport myself back to moments of deep insight, connection, and spiritual growth.
8. Add an index
Ok, so this might not be quite as much fun as the rest of my suggestions but an index is an invaluable tool in your grimoire. Leave a few pages at the front of your book (or, if you’ve started your grimoire already, in the back of your book) and create an index to help you navigate your grimoire easily. Making an index is incredibly simple, on the left side of the page make a one inch column, this column is for page numbers. The right side of the page is for writing in the content that’s on each page. Then, all you have to do is number each page as you create them and add the page numbers with the page titles in the back of the book. All it takes is 30 seconds at the end of each page or set of pages to log what you’ve done for the day and it can save you a TON of time when it comes to using your index.
I use an index for all of my magical books, regardless of what type of book it is. I’ve found that it’s particularly helpful in larger books or in books that are written chronologically like journal style grimoires and dream records. For these, there often isn’t a title for each page so I’ll just use a brief description of the page content.
For example, I might put “pp. 45-48 | Dream about cliff climbing” or “pp. 18-19 | Banishing spell – mirror”. These brief descriptions allow me to jump back to any part of my book with ease, meaning I never have to spend ten minutes digging through my journals to find that one spell that I wanted to use.
Bonus idea: Make the book yourself!
This might seem a touch extreme to some people but for those with a real crafty DIY streak making your own book is both possible and very, very fun. Not to mention rewarding! When making your own book you can customize it however you like, from the paper to the size, the number of pages, binding type, cover material, decorations, and so much more. It can take practice to get started but hey, who doesn’t love having extra blank notebooks lying around to fill with ideas, doodles, and notes?
I have a few favorite methods of bookmaking, for beginners, I’d suggest this simple tutorial. For people feeling a little more adventurous, you might try this bookbinding technique or a larger hardback book style of book binding.
This is one place where you can really get creative. Your grimoire is 100% YOURS. Made for your use, to your preferences so don’t be worried about trying to make it “right”! As long as you like it, it’s right, what other people think doesn’t matter. And yes, this goes for those of you who prefer the ultra-minimalist, black words on white paper and nothing more look. Making your grimoire contemporary and modern in that way is an aesthetic choice and if it makes you happy then it’s perfect!
Check out the rest of the Grimoires For Beginners series!
Grimoires For Beginners Pt. 1: What Is A Grimoire And A Look At The Most Common Types Of Grimoires
Grimoires For Beginners Pt. 2: How To Create Your Own Grimoire As A Beginner
Grimoires For Beginners Pt. 3: You Are Here!
New to witchcraft?
Sign up for my FREE Witchcraft class!

I have one from an art book a friend of mine made. I tore out the pages with her art on them so she can keep them, and then made the book my own. I also have a binder I started out with where I printed info and put it in the sleeves. I also have leaves, pictures, knot spells, etc tucked into the sleeves. I think I want to get a smaller binder though and recreate the binder one to have a more portable kind of altar book.
Interesting to read thoughts of others.
I have one, non-bleached, "real bound" archival book. Made a leather sleeve (200 old leather, made by a relative!) for durability. I have a few separate illustrations, that I have sort of riveted into it (stole some of my sisters scrapbooking supplies), made on real pergament, home made paper, salmon hide and such.
Contents are actually mostly historical spells I’ve gathered, along with my own bindrunes, galdrs and such. I hope someone will find it long after I’m gone, and cherish it like a real treasure.